Have you ever asked these questions?
- “My sign company called and said I need to give them and .eps file, what is that?”
- “Can I use this logo I pulled off of the internet in my brochure?”
- “What is a vector, anyways?”
Well, question no more! I’m going to briefly go over some of the most common file types and when you would want to use them.
Vector vs. Raster
The first big division among image file types is whether they are vector or raster. Raster (or bitmap) images are probably what you’re the most familiar with.
A raster image consists of pixels, and close up will look something like this:
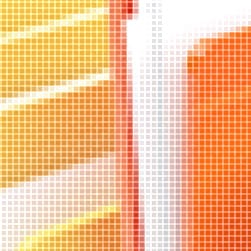
Close-up of a raster image
A vector image, on the other hand, almost isn’t actually an image. Instead of being an image, a vector file consists of mathematical points, curves, and other rules that describe the image. Because of this, a vector image can be scaled up infinitely in size without losing quality, unlike a raster file.

Close-up of a vector image, and the paths that describe it.
The most common kinds of vector files that you will come across are .svg, .ai and .eps files. PDF files can also contain vector images
So, when do I want to use a vector file?
There are three main cases in which you would want to have a vector file on hand:
- If you’re going print your logo on something big (vehicle, billboard). With a vector format, you can blow your logo up to the size of a billboard, and still have a nice small file that you can e-mail around. A raster file of that size will be huge by comparison, and be something of a challenge to get to your printer.
- Any time you need to have decals made, clothing embroidered, or screen printing done. Because of how vector files are formatted, they are much easier for printers to separate into different colours for embroidery, or printing, and they can be used directly to cut out your decals.
- When your logo absolutely has to be crisp and sharp, whether it’s a poster, brochure, or business card, using a vector files ensures that your logo will be as crisp as possible.
The only real downside to vector files is that they often aren’t supported for viewing on the web, and to edit them you will need to have a special program to do so, such as Adobe Illustrator, or Corel Draw.
And raster files?
Raster files are probably what you’re a bit more familiar with. The most common file formats that they come in are .gif, .tiff, .png, and the ubiquitous .jpg. Chances are that you have at least a few of these on your computer right now.
Just as vector images have their benefits, so do raster images.
- Raster images are the best for using on the web. JPGs and PNGs are the most common. PNGs have the advantage of being able to be transparent, with the trade-off of having a higher file size in some cases. GIF files are good to use when file size might become an issue, but can only display a limited amount of colours.
- Programs like Microsoft Office only support raster images, so if you want to throw you’re logo in with a Word document, you’ll want to have it as a JPG or PNG.
- Most photographs and many other images you have will be in a raster format, these are fine for printing, just so long as they are of a high enough resolution.
A general rule of thumb for image size is:
- Web and Screen: 72 dpi (Higher though for devices with retina display)
- Large Format Printing (such as billboards or signage): 150 dpi
- All other print materials: 300 dpi is a good place to start, but many printers now prefer to have higher resolution images, be sure to check!
What about resizing images, can I make this .jpg bigger?
That’s a bit of a tricky question, it depends a lot on what the original size of the image is, and what size you want it to be. Say you have a 2” x 2” image that’s 400 dpi, you can increase it’s size to 2.5” x 2.5” and it’s dpi will scale down to 300, so it would still be perfectly fine for printing in most cases. However, if you pull a 2” x 2” 72 dpi image off of the internet and try and scale it up, you’re going to have a bad time. In those cases there simply isn’t enough data to scale the image up and still have it look nice and sharp. Scaling an image up too far will result in it looking pixelated.
You can however always make an image smaller, just remember to do it in proportion!
And now you know the basics of image files and how to use them!